Universal Planetary Volumetric Cloud & Atmosphere Engine v_01

In this latest Vibe Coding season, after about two months of working with AI and researching the topic, I developed a reasonable atmospheric and volumetric cloud engine.

:play_button: Universal Planetary Volumetric Cloud & Atmosphere Engine v_01 - HTML Three.js | YouTube


:globe_showing_americas::sun_behind_cloud::video_game: LIVE DEMO :backhand_index_pointing_down::backhand_index_pointing_down::backhand_index_pointing_down:


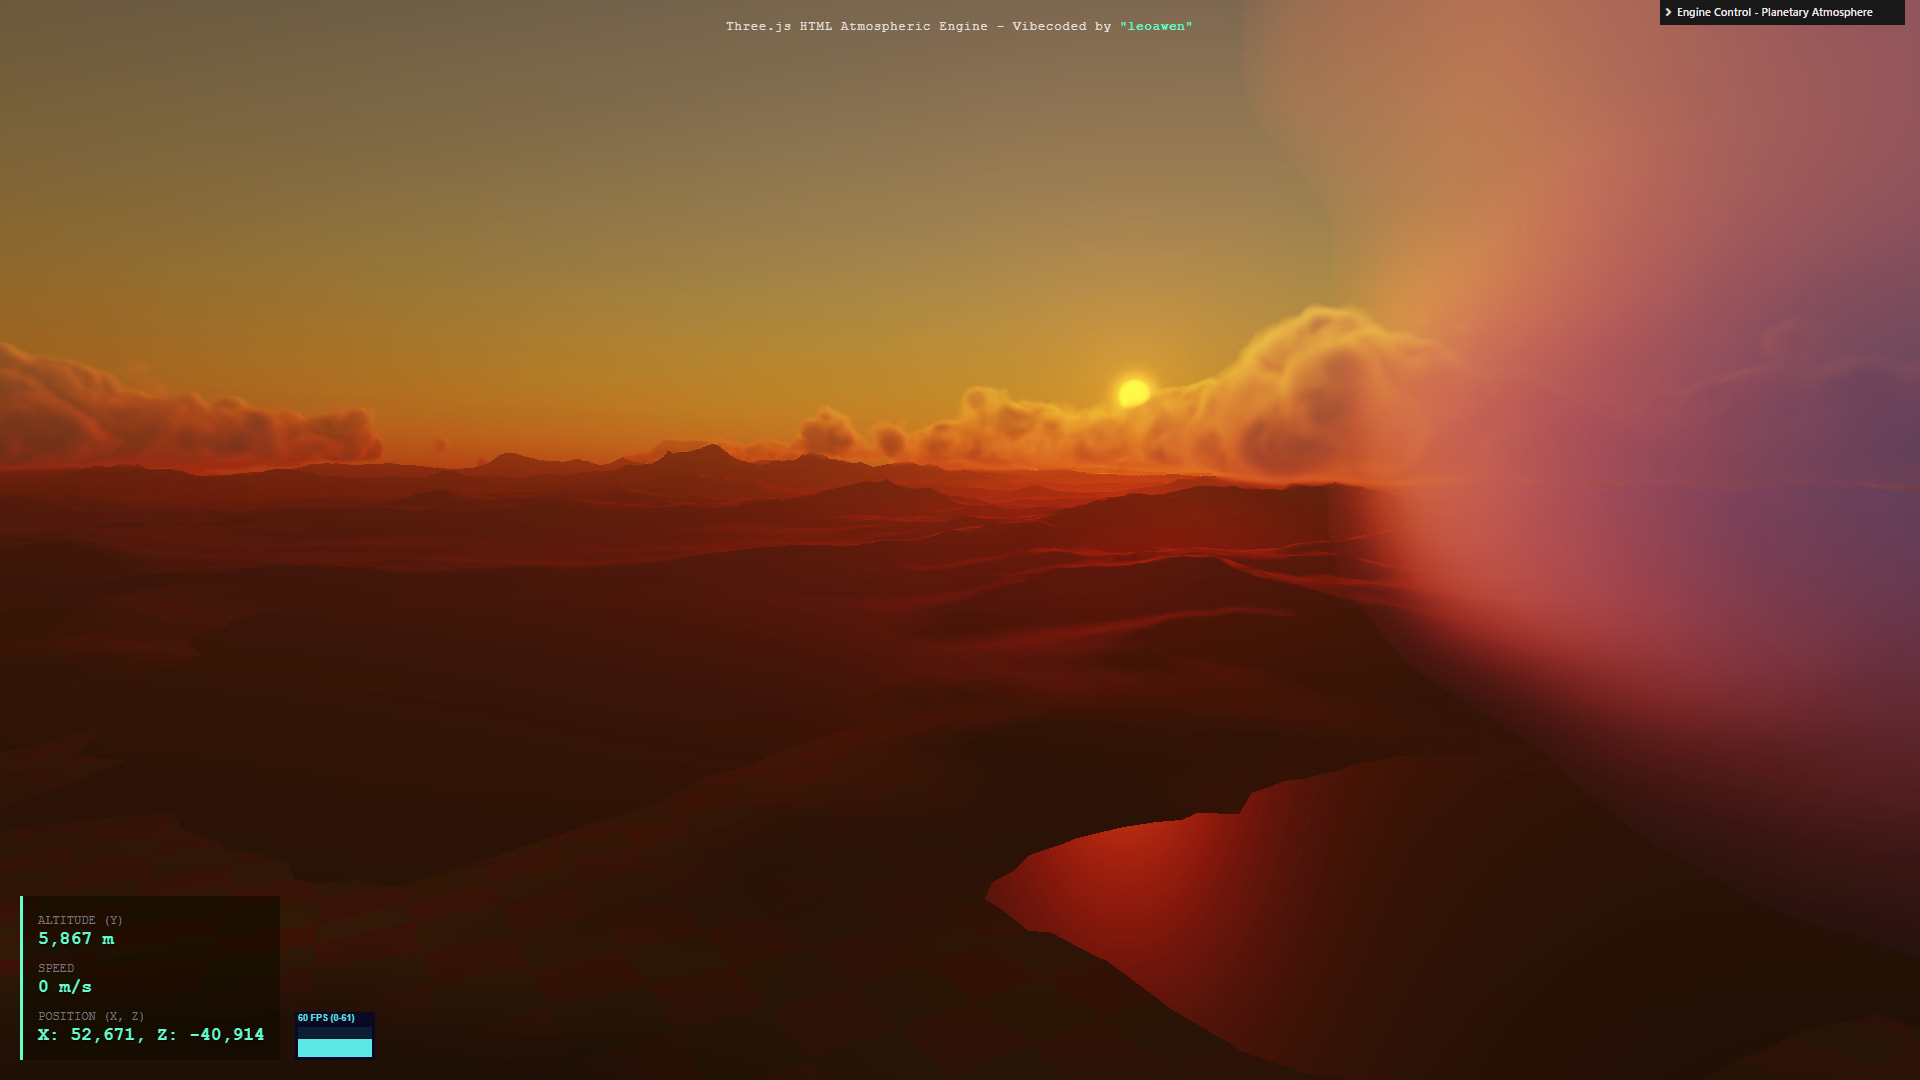
Universal Planetary Volumetric Clouds & Scattering Atmosphere Engine - HTML, Three.js


A fully real-time, physically-based planetary atmosphere and volumetric cloud rendering engine built from the ground up using Three.js and GLSL. This project serves as an educational tool and a demonstration of advanced real-time graphics techniques in a web browser.

It simulates light scattering through a planetary atmosphere (Rayleigh and Mie scattering) and renders dynamic, three-dimensional clouds using raymarching. All parameters are exposed through a control panel, allowing for deep customization of the final look.

:sparkles: Key Features

  • Physically-Based Atmosphere: Accurate simulation of atmospheric light scattering, creating realistic sunsets, blue skies, and atmospheric haze that correctly colors distant objects.
  • Volumetric Cloud Rendering: Clouds are rendered as true 3D volumes using a raymarching algorithm in a GLSL fragment shader.
  • Procedural Generation: All cloud shapes are generated on-the-fly using a combination of procedurally generated 3D Perlin and Worley (cellular) noise textures, which are “baked” at runtime.
  • Dynamic Weather System: A global 2D weather map influences cloud coverage and shape across the entire planet, creating large-scale weather fronts and clearings.
  • Advanced Post-Processing: Features high-quality effects like God Rays (crepuscular rays), Temporal Anti-Aliasing (TAA) for smooth cloud rendering, and filmic tone mapping.
  • Floating Origin System: Allows for exploring virtually infinite distances without encountering floating-point precision issues, enabling true planetary-scale flight.
  • Highly Customizable: An extensive lil-gui control panel allows for real-time manipulation of nearly every parameter, from the physical laws of the atmosphere to the shape, density, and color of the clouds.

:joystick: Controls

  • W, A, S, D: Move forward, left, backward, and right.
  • SPACE: Ascend.
  • SHIFT: Descend.
  • MOUSE: Look around.
  • ESC: Lock/Unlock the mouse cursor.

:gear: How It Works: The Rendering Pipeline

The engine uses a deferred rendering pipeline combined with several post-processing passes. Here is a high-level overview:

1. The “Bake” - Procedural Texture Generation

At startup, the engine pre-calculates complex noise patterns into 3D textures. This is a critical optimization.

  • A Base Shape Texture is generated by mixing Perlin and Worley noise to define the main cloud structures.
  • A Detail Texture is generated using multiple frequencies of Worley noise, which is later used to “erode” the edges of the clouds, creating fine, wispy details.
  • A Weather Map is generated as a 2D texture that wraps around the planet.

2. The Solid World Pass

The planet, terrain, and any other solid objects are rendered into a texture (the sceneRenderTarget), which also stores their depth information in a depth buffer.

3. The Cloud Pass - Volumetric Raymarching

This is the core of the engine. A full-screen shader is run to render the clouds.

  • For each pixel on the screen, a ray is cast from the camera.
  • The shader “marches” along this ray, step-by-step, sampling the 3D cloud textures at each point to determine the cloud density.
  • While marching, it calculates how light from the sun and sky would scatter and be absorbed inside the cloud volume, accumulating color and opacity.
  • This pass uses Temporal Anti-Aliasing (TAA), blending the current frame with the previous one to create a much smoother and higher-quality result than would be possible in a single frame.

4. The Final Composition Pass

The final image is assembled:

  • The atmospheric scattering (the sky) is calculated.
  • The solid world from Pass 2 is blended with the atmospheric fog.
  • The volumetric clouds from Pass 3 are blended on top.
  • Post-effects like God Rays are added.
  • Finally, exposure control and tone mapping are applied to produce the final color.

™️ Credits

This project was developed by leoawen with the assistance of Google’s AI for code structuring, documentation, and translation.

:books: References & Inspiration

This project was built using techniques and mathematical foundations inspired by the amazing work of the graphics community. Special thanks to:

  • Fast Atmosphere by Fewes in 2024-01-19 on Shadertoy - This was a primary reference for the atmosphere.

:scroll: License

This project is open-source and available under the MIT License. See the LICENSE file for more info.

GitHub Repository

8 Likes

pretty cool
I will definitely look at the volumetric cloud and atmosphere code.
You always say your showcases are vibecoded but you obviously know what you’re doing ( this explain the nice result :wink: )
thanks for sharing them!

2 Likes

Woaw!!! Very nice, thanks to share.

1 Like

Thanks! It’s looking like a great project. Will definitely try it in free time and perhaps try to combine with my 3d maps.

1 Like

Thanks! Glad you liked it :blush:

If you end up trying it with your 3D maps, please feel free to share some images or a demo here!

1 Like

It would be hard to not appreciate such a great work with micro and macro scale combined.

It will take some time till I’ll get into it, but definitely will try it along with sharing screenshots and live demo here. I’ve posted my maps in this topic: 3d map 2500km² running on three.js and 3dtilesrenderer

1 Like

Thank you very much for the message, Oxyn.

I’ll be very honest: I actually feel a bit embarrassed admitting that I don’t know how to code at all. I can’t write a single line of code on my own. I don’t really understand or master the language being used, nor do I know the underlying mathematics — trigonometry, derivatives, integrals. I’m essentially a complete passenger of AI. I also have no background in computer graphics.

I learned and developed this project as I went, through conversations with AI. It would introduce terms and concepts, and then I would research them further. The process was extremely fast, and the knowledge involved is so dense and sophisticated that I didn’t have time to properly digest the information or truly understand the full inner workings of the system we built. As long as debugging worked and things started behaving correctly, I simply kept moving forward without fully absorbing what I had implemented — otherwise it would have taken far too long to finish the project. I would really love to have the time to study everything calmly and properly digest all the knowledge involved.

What I can do is understand the theory behind the concepts, resources, and elements involved. I have a grasp of basic math, understand the idea of a function (one value varying as a function of another), the need to use a modulus — but I’m not very comfortable even with matrices.

For example, the sun anti-flicker system (to prevent it from flickering at sunset due to camera movement and the imprecision of measuring a single pixel to determine whether the sun is visible or occluded) was something I personally refined. I identified the issue of single-pixel measurement imprecision and realized that relying on one pixel was not effective. From there, I kept refining the logic until I arrived at a hysteresis-based solution. The AI later told me that what I had come up with corresponded to a hysteresis exclusion logic — I had the idea, and the AI gave me the formal name for the concept.

That said, I have no real idea how to properly structure a scene, define the final composition, organize rendering steps, and so on. The key point is that current AI systems have an absurd debugging capability. The use of computer vision was absolutely decisive in making this project possible — both with images and videos. I use Google Studio with Gemini for vibecoding. Many times, I had to record videos and present them to the AI. If you provide a video along with the code and describe the problem, the AI can effectively debug the system. It feels like witchcraft!

I was basically just trying things out and testing. Whenever something worked, I pushed further to see how far it could go. And the final result is what you see here.

Just to illustrate one example of AI interaction and system debugging: when I was developing the cloud container and migrated from a flat cubic container to a spherical concept, this issue appeared. I submitted the image and the code to the AI, and it was able to analyze, identify, and fix the problem.

Here’s an excerpt from the AI’s evaluation:

The problem you are facing is a classic issue in volumetric rendering called “Planar Depth Distortion.”

Diagnosis:

  1. The depth buffer (the texture that reads the planet) stores the straight-line distance from the camera plane (Z-axis).

  2. Raymarching (your cloud shader) calculates the actual distance traveled by the ray (Euclidean distance).

  3. The error: When looking toward the horizon or downward, the ray travels a much longer distance than the stored Z-depth. The current code (float geoDist = geometryViewZ) assumes they are the same. This causes the shader to think the ground is much closer than it really is, prematurely cutting the clouds (the “flickering” behavior or complete disappearance).

To fix this, we need to apply a trigonometric correction based on the camera’s view direction.

And to make things worse, I don’t even know if the AI’s analysis was actually correct — but it did solve the problem. And the proof of concept is the final result of the program presented here!

My next adventure will probably be trying to play around with ray tracing! :grinning_face_with_smiling_eyes:

1 Like

Thanks for the explanations!
What you describe is the concept of “white paper”: Someone provide requirements and specs, and give them to developers to code (the Ai in this case). The person writing the paper is not required to know exaclty how it’s coded, however they must know exactly what it should do. It still require very accurate methodology tho :laughing: (it’s a real profession by the way)

3 Likes