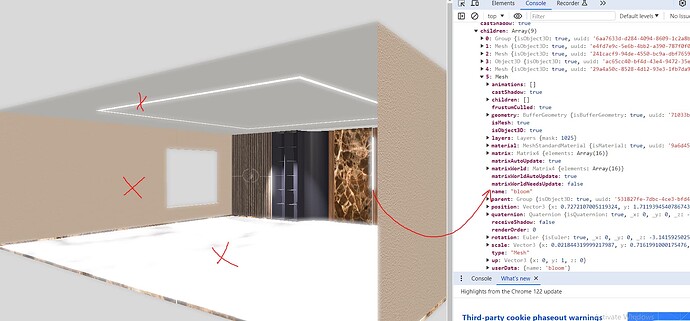
I followed a tutorial by anderson mancini - https://www.youtube.com/watch?v=er02gtD8asA&ab_channel=AndersonMancini-ThreejsJourney
I coded accordingly except for the part where he traverses the scene for the mesh, i search it with getObjectByName funtion. The whole scene is getting the bloom effect however i want just the blook object to get it.
import * as THREE from 'three';
import { OrbitControls } from 'three/examples/jsm/controls/OrbitControls.js';
import { GLTFLoader } from 'three/examples/jsm/loaders/GLTFLoader.js';
import { RGBELoader } from 'three/examples/jsm/loaders/RGBELoader.js';
import { DRACOLoader } from 'three/examples/jsm/loaders/DRACOLoader.js';
import { BloomEffect, EffectComposer, EffectPass, RenderPass, SelectiveBloomEffect } from "postprocessing";
import { Selection } from 'postprocessing';


//Initialising a scene and camera
const scene = new THREE.Scene();
const camera = new THREE.PerspectiveCamera(
  50,
  window.innerWidth / window.innerHeight,
  0.1,
  1000
);

//initialising the renderer and inserting it into DOM element
const renderer = new THREE.WebGLRenderer({antialias:true});
renderer.setSize(window.innerWidth, window.innerHeight);
renderer.shadowMap.type = THREE.VSMShadowMap;
document.body.appendChild(renderer.domElement);

//declaring shadown maps and tone mapping of the scene
renderer.shadowMap.enabled = true;
renderer.toneMapping = THREE.ACESFilmicToneMapping;
renderer.toneMappingExposure = 0.5;
renderer.setPixelRatio( window.devicePixelRatio );


/*const composer = new EffectComposer(renderer);
composer.addPass(new RenderPass(scene, camera));
composer.addPass(new EffectPass(camera, new BloomEffect()));*/


let model; // Declare the model variable at a higher scope

//loading the HDRI to the scene
const hdriLoader = new RGBELoader();
hdriLoader.load('../env1.hdr', (texture) => {
  const envMap = texture;
  envMap.mapping = THREE.EquirectangularReflectionMapping;
  envMap.exposure = 0.25;
  scene.environment = envMap;
  scene.background = new THREE.Color(0.5, 0.5, 0.5);
});

/*
const renderScene = new RenderPass(scene,camera);
const composer = new EffectComposer(renderer);
composer.addPass(renderScene);

const bloomPass = new UnrealBloomPass(
  new THREE.Vector2(window.innerWidth,window.innerHeight),
  1.6,
  0.1,
  0.1
);

composer.addPass(bloomPass);
*/


//loading the model using the GLTF loader
const loader1 = new GLTFLoader();

const dracoLoader = new DRACOLoader();
dracoLoader.setDecoderPath('https://www.gstatic.com/draco/versioned/decoders/1.5.6/');
loader1.setDRACOLoader(dracoLoader);

let selectedobjectforbloom = new Selection();
const composer = new EffectComposer(renderer);
const renderpass = new RenderPass(scene,camera);

loader1.load(
  'interior_threejs.glb',
  function (gltf) {
    model = gltf.scene;
    model.position.set(0, 0.01, 0);
    model.traverse((child) => {
        if (child.isObject3D) child.castShadow = true;
      });
    // Assuming you've loaded the GLTF model into the scene and named the light in Blender as 'pointLight'

      // Traverse through the scene to find the light
      model.traverse((child) => {
       if (child.name === 'Spot') {
        // Access the punctual light
          const pointLight = child;8

           // Now you can access properties of the light
          console.log('Punctual light intensity:', pointLight.children[0].intensity);
          console.log('Punctual light color:', pointLight.children[0].color);
          console.log('Punctual light position:', pointLight.position);

    // You can also manipulate the light properties if needed
    // For example:
        pointLight.children[0].intensity = 25;
         //pointLight.color.set(0xff0000);
  }
  const scene1 = model.getObjectByName("Scene", true);
  scene1.receiveShadow = true;

  const object = model.getObjectByName( "Cube", true );
  object.receiveShadow = true;
  object.castShadow = true;

  const object1 = model.getObjectByName("Cube002",true)
  object1.receiveShadow = true;
  object1.castShadow = true;

  const object2 = model.getObjectByName( "Cube001_2", true );
  object2.receiveShadow = true;
  object2.castShadow = true;


  const selectiveBloom = new SelectiveBloomEffect(scene,camera, {
    intensity : 1.5,
    luminanceThreshold : 0.0001,
    mipmapblur : true,
    radius : .35,
  })

  selectiveBloom.selection =  selectedobjectforbloom;

  const obj = model.getObjectByName("bloom", true);
  selectedobjectforbloom.add(obj);


  composer.addPass(renderpass);
  composer.addPass(new EffectPass(camera, new BloomEffect(), selectiveBloom));


});

      scene.add(model);
      console.log(model);

    },
    undefined,
    function (error) {
      console.error('Error loading GLTF model:', error);
    }
  );
    /*
  let selectedobjectforbloom = new Selection();

  const selectiveBloom = new SelectiveBloomEffect(scene,camera, {
    intensity : 1.5,
    luminanceThreshold : 0.0001,
    mipmapblur : true,
    radius : .35,
  })

  selectiveBloom.selection =  selectedobjectforbloom;

  const obj = model.getObjectByName("bloom", true);
  selectedobjectforbloom.add(obj);

  const composer = new EffectComposer(renderer);
  const renderpass = new RenderPass(scene,camera);
  composer.addPass(renderpass);
  composer.addPass(new EffectPass(camera, bloom, selectiveBloom));*/

// Initialize ambient light
const ambientLight = new THREE.AmbientLight(0xffffff, 1); // Color: white, Intensity: 1
scene.add(ambientLight);


const directionalLight = new THREE.DirectionalLight(0xffffff,8);
directionalLight.position.set(-6.5,2.5,-1.5);
directionalLight.castShadow = true;
scene.add(directionalLight);

directionalLight.shadow.mapSize.width = 1024; // Shadow map width
directionalLight.shadow.mapSize.height = 1024; // Shadow map height
directionalLight.shadow.camera.near = 0.5; // Near plane of shadow camera
directionalLight.shadow.camera.far = 500; // Far plane of shadow camera
directionalLight.shadow.camera.left = -10; // Left boundary of shadow camera's frustum
directionalLight.shadow.camera.right = 10; // Right boundary of shadow camera's frustum
directionalLight.shadow.camera.top = 10; // Top boundary of shadow camera's frustum
directionalLight.shadow.camera.bottom = -10;
directionalLight.shadow.bias = 0; // Shadow bias
directionalLight.shadow.normalBias = 1; // Shadow normal bias
directionalLight.shadow.radius = 4;

  //orbit controls for the chair
const orbit = new OrbitControls(camera, renderer.domElement);
camera.position.set(0, 2, 3);
/*
// Set limits for rotation
orbit.minPolarAngle = 0; // radians
orbit.maxPolarAngle = 1.309; // radians

// Set limits for zoom
orbit.minDistance = 1;
orbit.maxDistance = 3;
*/
orbit.update();

//animate to render it realtime
function animate() {
    requestAnimationFrame(animate);
   // renderer.render(scene, camera);
    composer.render();
  }
  animate();
the above is my code and the output is shown below


